AA Labtech (PVT) LTD

laboratory-incubators

INTRODUCTION

In every laboratory, an incubator plays a vital role in maintaining stable environmental conditions for the growth of microorganisms, cells, or tissue cultures. To ensure accurate and reliable results, your incubator must operate at its best — and this depends greatly on proper cleaning, operation, and regular calibration.

Calibration of an incubator ensures that temperature and humidity levels remain stable and accurate, providing ideal conditions for your samples. In this guide, we’ll discuss the incubator calibration procedure, cleaning, operation, and validation methods to help you maintain your lab equipment effectively.

1. Cleaning Your Lab Incubator

A clean incubator minimizes contamination and ensures consistent performance. Follow these steps to keep your unit in top condition:

Step 1: Transfer Your Samples

Before starting, move your cultures or specimens to another incubator. This prevents any risk of contamination or temperature fluctuation during cleaning.

Step 2: Turn Off Power and Gas Supply

Always disconnect the incubator from the power source and shut off any CO₂ or gas connections before cleaning.

Step 3: Remove Internal Components

Take out shelves, trays, and water pans. Clean them separately using a mild detergent or lab-grade cleaning solution. Rinse thoroughly and dry with a lint-free cloth.

Step 4: Clean Internal Surfaces

Use a non-abrasive cloth and mild cleaning solution to wipe down the chamber walls, fan guards, door gaskets, and sensors. Follow with 70% alcohol for disinfection. Avoid using harsh chemicals that could damage sensors or seals.

Step 5: Dry and Reassemble

After cleaning, allow all components to dry completely before reassembling. This prevents mold growth and maintains optimal humidity balance.

Step 6: Run a Decontamination Cycle

If your incubator supports an automatic decontamination feature, run it to eliminate any remaining microbes or spores.

Step 7: Clean the Exterior

Wipe the outer surface using a soft cloth dipped in mild soapy water. Focus on high-contact areas like door handles and switches to maintain hygiene.

2. Operation of Lab Incubator

Once your incubator is clean and dry, follow these steps for safe and accurate operation:

  1. Plug in and Power On: Connect the incubator to a stable power source and press the main switch.

  2. Set the Desired Temperature: Use the control panel to adjust temperature settings. Always verify with a calibrated thermometer.

  3. Monitor Humidity Levels: For humidified incubators, fill the water reservoir with distilled or deionized water. Avoid tap water to prevent mineral buildup.

  4. Check Air Circulation: Ensure that fans and vents are unobstructed for proper temperature uniformity.

  5. Maintain Records: Log temperature readings at least twice a day. This helps track stability and detect early performance issues.

3. Incubator Calibration Procedure

Calibration ensures that your incubator maintains precise environmental conditions for accurate experimental results.

Step 1: Prepare for Calibration

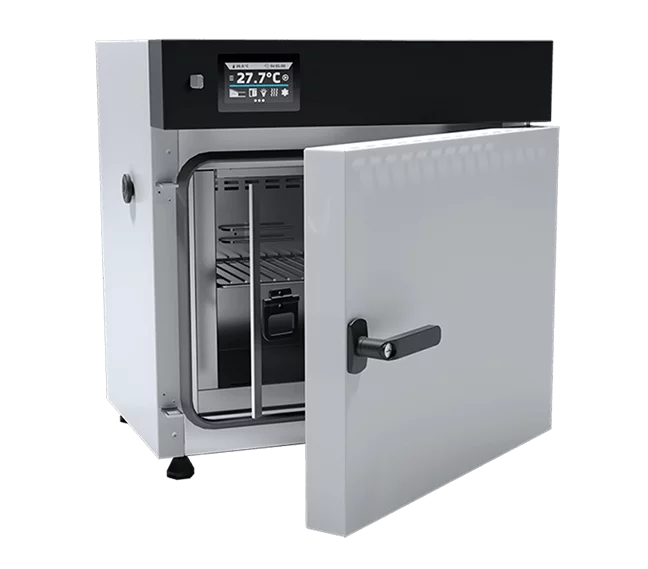
Before starting, transfer any active cultures to another incubator. Allow the unit to stabilize at its set temperature.

Step 2: Insert Calibration Equipment

Use certified thermometer probes or temperature sensors traceable to ISO-17025 calibration standards. Place them at various points inside the chamber to assess temperature uniformity.

Step 3: Record Data

Turn on the incubator and let it stabilize for 30–60 minutes. Record readings from both the incubator display and the external probes.

Step 4: Conduct a Temperature Uniformity Test

Check if the temperature difference between various points inside the chamber is within acceptable limits (usually ±0.5°C). Significant variations indicate uneven heating or airflow issues.

Step 5: Verify Humidity Levels

Perform a humidity calibration in the incubator by using a hygrometer or humidity sensor. Compare readings with the incubator’s built-in humidity display to ensure accuracy.

Step 6: Thermometer Probe Accuracy Check

Compare your incubator’s thermometer readings with reference thermometers. Any deviation beyond the allowable tolerance range requires recalibration or adjustment.

Step 7: Adjust and Validate

If discrepancies are found, adjust the incubator’s controller and recheck the readings. Repeat until the actual and displayed temperatures match within specified limits.

Step 8: Generate a Traceable Calibration Report

After successful calibration, create a traceable calibration report documenting:

  • Set and measured temperatures

  • Humidity readings

  • Calibration date and technician details

  • Reference instrument serial numbers

A traceable report ensures compliance with international standards and helps maintain your lab’s accreditation.

4. Calibration Frequency for Incubators

How often should an incubator be calibrated?
The calibration frequency for incubators typically depends on usage and regulatory requirements. However, most laboratories perform calibration every 6 to 12 months. High-precision or critical research applications may require more frequent validation — for example, quarterly or after any repair or relocation.

5. Preventive Maintenance of Incubator

Regular preventive maintenance of the incubator helps extend its lifespan and ensures reliable performance. Key steps include:

  • Checking door seals for air leaks.

  • Cleaning filters and vents monthly.

  • Verifying CO₂ levels and gas flow accuracy.

  • Ensuring the water reservoir is filled with clean, deionized water.

  • Performing regular incubator temperature validation and documentation.

Partnering with a professional ISO-17025 calibration service provider guarantees that your incubator remains compliant, accurate, and dependable.

Proper cleaning, operation, and calibration of incubators are essential for maintaining optimal performance and ensuring accurate laboratory results. Following standard procedures like temperature uniformity tests, thermometer probe accuracy checks, and humidity calibration helps your incubator perform reliably.

Always use certified calibration standards and maintain a traceable calibration report for compliance and quality assurance. By scheduling regular calibration and preventive maintenance, you can ensure that your incubator remains efficient, accurate, and ready for precise research work.

Leave a Reply

Your email address will not be published. Required fields are marked *